


emailbox's
Guide for Heroes
<Best viewed in Dark Theme>
Foreword
I've been meaning to write a guide with as much depth as my old F/P Mage guide (which can be found here), but didn't bother to do so for my Corsair guide (which can be found there).
As much as I'd like to make this 10 posts long and fill it with information for all the little data seekers out there, that's not what this guide is for. This guide is for the average player that may want to know some key points and/or information about Heroes that may not be that easy to find. If you want a per-level skill multiplier guide, just go here.
On to the actual foreword!Spoiler!
I recently quit my Corsair, zFlight (AKA zfgt) and switched to playing a Fighter/Sader/Hero. I'm currently in my 14x levels, and I doubt that will change any time soon; however, I have played a Hero(ine) in less legitimate, gMS-like servers, and found them lots of fun (which is why I made one in the first place).
Anyone who knows my Mapling style will tell you that I do a lot of research on skills and AP builds prior to making a character, and will often leave my secondary stat extremely low just so that I don't have to spend more on resetting down, say, STR on my Corsair (zfgt has 30 base STR and has had 30 base STR from about level 30). On the other hand, I also spend a ****ton of money (both meso and NX) to fund my characters, most of which I quit just past 4th job (BoxxyMail, 123; zSyph, 122; blah blah blah).
As such, I'm relatively well versed in the skill builds, AP distributions, and other such things that make the game boring for the characters I own -for the time frame, of course. I know basically nothing about Dual Blades at the moment, thanks to Big Bang/Chaos and not having played BoxxyMail since the BB patch.
This guide is essentially my knowledge compiled (and more added as I research further) and condensed in a readable format. Enjoy~
Disclaimer
Spoiler!1. Don't copy this guide without my permission.
2. I like pink. Don't hate.
3. This is a GUIDE, not a rulebook. Whether or not you choose to follow it is up to you. Please don't post saying "I THINK YOU SHOULD DO THIS FIRST, OR MAYBE THAT"; that's not the point of the guide. The guide is a relay of my own experiences; if you think differently, then feel free to post saying "well I tried this and it worked", but, for the love of God, do not post "CHANGE THIS IT'S WRONG" unless it's actually wrong like I got a skill description messed up or something.
Guide
--------------------------------------------------------------------------------------------------------------------
[Important links]
Potential System Guide
Profession Recipe Guide
Leveling Guide - Lex (Phazonkirby)
Comprehensive Guide to Training Locations < Slightly outdated.
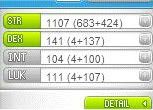
[AP Distribution]
This is actually the easiest part of the guide. Put all your AP into STR. You won't ever need DEX.
Proof:
[Training Locations]
Below is a list of locations at which I trained at (not necessarily the best locations)
Spoiler!1-10: Maple Island
11-15: Blue Ribbon Pigs
15-30: Mushmom, Blue Mushmom, Zombie Mushmom (YOU CANNOT TRAIN AT MUSHMOM ANYMORE)
30-37: Spear Pepe
37-45: CDs
45-57: Scarecrows
57-80: Twisted Jesters
80-85: Iron Mutae
85-92: C-2
92-98: Mysterious Path 3 (MP3)
98-104: Pirates 2
104-108: Ghost Pirates
108-113: Dual Ghost Pirates
113-Current: LHC (with a bit of DGP and Leafre)
[SP Distributions]
Because it seems that people need level by level SP allocations (I have no idea why this is), I'll do the tedious task of making it so.
First Job - Swordsman
Spoiler!10:1 Power Strike (1)
11: 3 Slash Blast (3)
12: 3 Slash Blast (6)
13: 3 Slash Blast (9)
14: 3 Slash Blast (12)
15: 3 Slash Blast (15)
16: 3 Slash Blast (18)
17: 2 Slash Blast (Max), 1 Power Strike (2)
18: 3 Power Strike (5)
19: 3 Power Strike (8)
20: 3 Power Strike (11)
21: 3 Power Strike (14)
22: 3 Power Strike (17)
23: 3 Power Strike (Max)
24: 3 HP Boost (3)
25: 3 HP Boost (6)
26: 3 HP Boost (9)
27: 1 HP Boost (Max), 2 Iron Body (2)
28: 3 Iron Body (5)
29: 3 Iron Body (8)
30: 3 Iron Body (11)
Note that you can raise Iron Body eariler as it may help with saving pot costs at lower levels. This build is mainly for people who want to grind to 30 (which is often faster in more crowded servers). You can also choose to leave PStrike at 11 and max Iron Body, if you're some sort of buff whore.
Results
Spoiler!HP Boost - 10/10
Power Strike - 20/20
Slash Blast - 20/20
Iron Body - 11/20
Second Job - Fighter
Spoiler!30: 1 Ground Smash (1)
31: 3 Weapon Mastery (3)
32: 2 Weapon Mastery (5), 1 Booster (1)
33: 3 Booster (4)
34: 2 Booster (6), 1 Weapon Mastery (6)
35: 3 Weapon Mastery (9)
36: 3 Weapon Mastery (12)
37: 3 Weapon Mastery (15)
38: 3 Weapon Mastery (18)
39: 2 Weapon Mastery (Max), 1 Ground Smash (2)
40: 3 Ground Smash (5)
41: 3 Ground Smash (8)
42: 3 Ground Smash (11)
43: 3 Final Attack (3)
44: 3 Final Attack (6)
45: 3 Final Attack (9)
46: 3 Final Attack (12)
47: 3 Final Attack (15)
48: 3 Final Attack (18)
49: 2 Final Attack (Max), 1 Rage (1)
50: 3 Rage (4)
51: 3 Rage (7)
52: 3 Rage (10)
53: 3 Rage (13)
54: 3 Rage (16)
55: 3 Rage (19)
56: 1 Rage (Max), 2 Power Reflection (2)
57: 3 Power Reflection (5)
58: 3 Power Reflection (8)
59: 3 Power Reflection (11)
60: 3 Power Reflection (14)
61: 3 Power Reflection (17)
62: 3 Power Reflection (Max)
63: 3 Physical Training (3)
64: 3 Physical Training (6)
65: 3 Physical Training (9)
66: 1 Physical Training (Max), 2 Booster (8)
67: 3 Booster (11)
68: 3 Booster (14)
69: 3 Booster (17)
70: 3 Booster (Max)
I find this works great for early Toy Room (Jesters). By your early 50's you have both Ground Smash and Final Attack maxed out, and max out rage at 56; this means at level 55 (earlier, if you wanted to) you could go straight to Jesters and basically annihilate them. With Ascension, you won't ever need to max out Ground Smash. Physical Training will help out a lot more end-game (since you never use GS after you get level 1 Brandish). However! Note that GS hits 4 monsters which is excellent at Toy Room, so get it to 11 early on (for the damage), and use it over Slash Blast.
Results
Spoiler!Mastery - 20/20
Booster - 20/20
Ground Smash - 11/20
Final Attack - 20/20
Rage - 20/20
Power Reflection - 20/20
Physical Training - 10/10
Third Job - Crusader
Pre-AscensionResults:Spoiler!70: 1 Brandish (1)
71: 3 Combo Attack (3)
72: 3 Combo Attack (6)
73: 3 Combo Attack (9)
74: 3 Combo Attack (12)
75: 3 Combo Attack (15)
76: 3 Combo Attack (18)
77: 2 Combo Attack (Max), 1 Brandish (2)
78: 3 Brandish (5)
79: 3 Brandish (8)
80: 3 Brandish (11)
81: 3 Brandish (14)
82: 3 Brandish (17)
83: 3 Brandish (Max)
84: 3 Shout (3)
85: 3 Shout (6)
86: 3 Shout (9)
87: 3 Shout (12)
88: 3 Shout (15)
89: 3 Shout (18)
90: 2 Shout (Max), 1 Chance Attack (1)
91: 3 Chance Attack (4)
92: 3 Chance Attack (7)
93: 3 Chance Attack (10)
94: 3 Chance Attack (13)
95: 3 Chance Attack (16)
96: 3 Chance Attack (19)
97: 1 Chance Attack (Max), 1 Panic (1), 1 Coma (1)
98: 3 Coma (4)
99: 3 Coma (7)
100: 3 Coma (10)
101: 3 Coma (13)
102: 3 Coma (16)
103: 3 Coma (19)
104: 1 Coma (Max), 2 Panic (3)
105: 3 Panic (6)
106: 3 Panic (9)
107: 3 Panic (12)
108: 3 Panic (15)
109: 3 Panic (18)
110: 2 Panic (Max), 1 Magic Crash (1)
111: 3 Magic Crash (4)
112: 3 Magic Crash (7)
113: 3 Magic Crash (10)
114: 3 Magic Crash (13)
115: 3 Magic Crash (16)
116: 3 Magic Crash (19)
117: 1 Magic Crash (Max), 2 MP Recovery (2)
118: 3 MP Recovery (5)
119: 3 MP Recovery (8)
120: 3 MP Recovery (11)
Brandish and Combo are obvious first picks; assuming you'll stay at Jesters for a little while, they'll help you out the most. Next, Shout was buffed a lot post Big Bang; it used to do a measly 150% damage but it's now at 220%. Combine this with Combo Attack and Chance Attack and you're sitting at almost 350% damage to stunned monster with Shout. Note that it also hits 10 monsters with one attack when maxed and has a 95% chance to stun for eight frickin seconds. Anyway, this is your attack of choice at Pirate Den 2, if you choose to train there.
Panic and Coma I find are pretty useless, but Panic moreso than Coma (because Coma is like an instant kill to 6 mobs, while Panic is the same to only one). Magic Crash I've used ONCE, at Ani to cancel the super defense up buff it has.
Spoiler!Brandish - 20/20
Combo Attack - 20/20
Panic - 20/20
Coma - 20/20
Shout - 20/20
Chance Attack - 20/20
Magic Crash - 20/20
MP Recovery- 11/20
Post-AscensionResults:Spoiler!70: 1 Brandish (1)
71: 3 Combo Attack (3)
72: 3 Combo Attack (6)
73: 3 Combo Attack (9)
74: 3 Combo Attack (12)
75: 3 Combo Attack (15)
76: 3 Combo Attack (18)
77: 2 Combo Attack (Max), 1 Brandish (2)
78: 3 Brandish (5)
79: 3 Brandish (8)
80: 3 Brandish (11)
81: 3 Brandish (14)
82: 3 Brandish (17)
83: 3 Brandish (Max)
84: 3 Coma (3)
85: 3 Coma (6)
86: 3 Coma (9)
87: 3 Coma (12)
88: 3 Coma (15)
89: 3 Coma (18)
90: 2 Coma (Max), 1 Chance Attack (1)
91: 3 Chance Attack (4)
92: 3 Chance Attack (7)
93: 3 Chance Attack (10)
94: 3 Chance Attack (13)
95: 3 Chance Attack (16)
96: 3 Chance Attack (19)
97: 1 Chance Attack (Max), 2 Panic (2)
98: 3 Panic (5)
99: 3 Panic (8)
100: 3 Panic (11)
101: 3 Panic (14)
102: 3 Panic (17)
103: 3 Panic (Max)
104: 3 Self Recovery (3)
105: 3 Self Recovery (6)
106: 3 Self Recovery (9)
107: 3 Self Recovery (12)
108: 3 Self Recovery (15)
109: 3 Self Recovery (18)
110: 2 Self Recovery (Max), 1 Magic Crash (1)
111: 3 Magic Crash (4)
112: 3 Magic Crash (7)
113: 3 Magic Crash (10)
114: 3 Magic Crash (13)
115: 3 Magic Crash (16)
116: 3 Magic Crash (19)
117: 1 Magic Crash (Max), 2 Shout (2)
118: 3 Shout (5)
119: 3 Shout (8)
120: 3 Shout (11)
With Ascension, Panic and Coma can be spammed (mostly), so you'll want to get those earlier on. I get Coma before Panic because there's no cool down.
Coma's stun persists even after you attack an enemy.
This is ****ing huge, so don't forget it.
Drop a point into Brandish at 70, as it now hits 3 mobs at level 1, then grab Combo Attack for the straight up damage. Max Brandish for more straight up damage, then Coma for the nice Stun effect which will stack with Chance Attack, which I get after that. Coma gives you a great 6 mob skill that can be spammed more than Panic (thanks to the 1 orb cost; Panic costs 2 orbs), which is why I get it before Panic. After Panic, we get Self Recovery for the passive, which helps, albeit a tiny bit, and then Magic Crash in preparation for future boss runs. Shout is pretty much useless with the Panic/Coma buff, so we leave that at 11.
Note that you can max Panic, Coma, and Brandish maxed in any order. I would consider getting Coma before Brandish, along with Chance Attack, since you can charge orbs with the level 1 Br you get at 70. I would still get Panic after Coma or Brandish because it's not spammable.
You can also choose to max Shout over Self Recovery, though I don't really recommend it; alternately, you can max Shout and leave Brandish at 11, if you can wait for Intrepid Slash or are planning to get to 4th job really fast.
Spoiler!
Self Recovery - 20/20
Fourth JobHeroism
Spoiler!120: 1 Rush (1), 1 Intrepid Slash (1), 1 Advanced Final Attack (1)
121: 3 ACA (3)
122: 3 ACA (6)
122: 3 ACA (9)
122: 3 ACA (12)
122: 3 ACA (15)
122: 3 ACA (18)
122: 3 ACA (21)
122: 3 ACA (24)
122: 3 ACA (27)
130: 3 ACA (Max)
131: 3 Intrepid Slash (4)
132: 3 Intrepid Slash (7) -> Does more damage than Brandish at this level
133: 3 Intrepid Slash (10)
134: 3 Intrepid Slash (13)
135: 3 Intrepid Slash (16)
136: 3 Intrepid Slash (19)
137: 3 Intrepid Slash (22)
138: 3 Intrepid Slash (25)
139: 3 Intrepid Slash (28)
140: 2 Intrepid Slash (Max), 1 Combat Mastery (1)
141: 3 Combat Mastery (4)
142: 3 Combat Mastery (7)
143: 3 Combat Mastery (Max)
144: 3 AFA (4)
145: 3 AFA (7)
146: 3 AFA (10)
147: 3 AFA (13)
148: 3 AFA (16)
149: 3 AFA (19)
150: 3 AFA (22)
151: 3 AFA (25)
152: 3 AFA (28)
153: 2 AFA (Max), 1 Stance (1)
154: 3 Stance (4)
155: 3 Stance (7)
156: 3 Stance (10)
157: 3 Stance (13)
158: 3 Stance (16)
159: 3 Stance (19)
160: 3 Stance (22)
161: 3 Stance (25)
162: 3 Stance (28)
163: 2 Stance (Max), 1 Enrage (1)
164: 3 Enrage (4)
165: 3 Enrage (7)
166: 3 Enrage (10)
167: 3 Enrage (13)
168: 3 Enrage (16)
169: 3 Enrage (19)
170: 3 Enrage (22)
171: 3 Enrage (25)
172: 3 Enrage (28)
173: 2 Enrage (Max), 1 Maple Warrior (1)
174: 3 MW (4)
175: 3 MW (7)
176: 3 MW (10)
177: 3 MW (13)
178: 3 MW (16)
179: 3 MW (19)
180: 3 MW (22)
181: 3 MW (25)
182: 3 MW (28)
183: 2 MW (Max), 1 Monster Magnet
184: 3 Monster Magnet (4)
185: 3 Monster Magnet (7)
186: 3 Monster Magnet (10)
187: 3 Monster Magnet (13)
188: 3 Monster Magnet (16)
189: 3 Monster Magnet (19)
190: 3 Monster Magnet (22)
191: 3 Monster Magnet (25)
192: 3 Monster Magnet (28)
193: 2 Monster Magnet (Max), 1 Rush (2)
194: 3 Rush (5)
195: 3 Rush (8)
196: 3 Rush (11)
197: 3 Rush (14)
198: 3 Rush (17)
199: 3 Rush (20) OR 1 Rush (18), 2 Hero's Will (2)
200: 2 Rush (22), 1 Hero's Will (1) OR 3 Hero's Will (5)
Jump happened next week. So yup, here's the revised build. Monster Magnet at level 1 sucks now, so get AFA instead; at level 1 it gives an additional 6% chance to proc and 14% more damage, which is the biggest boost you'll get for the skill. Oh, and 1 ATT. herpderp.
Early build is basically identical... ACA, then Intrepid, and then Combat Mastery. Then get AFA, as it'll boost your overall DPS quite significantly. Next, Stance, then Enrage. You're done.
Also... I forgot to throw in Hero's Will inside the actual build. There's a quest you need to do to get the skill; it's from Carta the Sea Witch (in Aqua). Anyway, it's a required skill as well, but I don't think anyone gets more than one point into it (correct me if I'm wrong). I would recommend you grab it around 17x or so, depending on if you go to Seducing boss runs (ANI NOT INCLUDED) or not. I'll probably max it considering Rush is rather pointless to max in the first place... Though again, no real point in getting it any time early on.
If you're wondering why I maxed Monster Magnet over Rush, I did so because post-Jump Monster Magnet mobs 6 at level 26, rather than at level 1 like it does now. There's also an increased stun duration (which is somewhat nice). The only thing that increases for Rush is the damage... which shouldn't be a priority in the first place. Intrepid Slash does more than enough damage, so Rush shouldn't be a move used to actually attack. I left Monster Magnet really late because it's not a priority. Yes, it's incredibly useful, but no, you won't be using it so much that you'll miss it over a maxed AFA, Stance, MW and Enrage. You can get it before MW (which you probably will), since MW20/30 is pretty much impossible to pass unless you're a merching fiend or otherwise have a **** ton of meso. Ideally you'd have MW maxed first though.
Brandish actually out damages Intrepid Slash until IS is level 7. I max ACA first, however, because it gives a much bigger boost to your damage overall (75%, or so) than Intrepid Slash with regular Combo Attack. Also it matches my pink outfit.
Results
Spoiler!Advanced Combo Attack (ACA) - 30/30
Intrepid Slash - 30/30
Power Stance - 30/30
Maple Warrior - 30/30
Enrage - 30/30
Advanced Final Attack - 30/30
Monster Magnet - 30/30
Combat Mastery - 10/10
Rush - 18/30 or 22/30
Hero's Will - 5/5 or 1/5
Herp derp, my hero got hacked, so Ihaven't played it for a few weeksquit. RIP Sylvia <3


 Reply With Quote


